Hello and welcome to my blog! This will be my first post after the redesign and I am excited to break the ice with a few tips to get you started with photography this year.
Some of the most influential photographs in human history have been taken with cameras exponentially worse than what you may have in your pocket right now. Technological advances in both hardware and editing software (apps) for mobile phones have given people access to tools that can very easily yield professional results if you know what you are doing. Fortunately, learning photography is not difficult and the 80% rule (Pareto Principle), stating that 80% of the outcome is derived from 20% of the input, very much applies.
So let’s get started with 5 quick tips to help you on your journey in learning photography.
Clean your Lens
The most basic things, like a dirty lens, can often times be the cause for a ruined photograph. This is especially true when considering how we use our mobile devices. Flipping them in landscape orientation to play a game, using fingerprint sensors (foolishly placed near the camera hardware like on my Galaxy S9+) and carrying them in our pockets can all add smudges and dirt to the lens. By wiping down your camera with a microfiber cloth, you will immediately ensure your image will come out crisp and in focus.
Use Manual Controls
Manual controls of your camera focus and the holy trinity of light manipulation (aperture, ISO and shutter speed) will not only give you greater creative freedom but will also slow you down enough to analyze and adjust your composition for a more pleasing result.
When we consider how mobile phones are used, it makes perfect sense that they are calibrated with very sophisticated facial recognition algorithms. We definitely want to be in focus when we are taking a selfie with our friends or in a video conference. However, the main subject will not always be a person when you are out and about taking photos. Always make sure to set the focus on your subject and not the random person in the background wondering why you are staring in their direction.
Photography is the study of light and aperture, ISO and shutter speed are all settings that control how much light your camera allows to be exposed onto the camera sensor. Let’s take a quick look at what each piece of the “holy trinity” entails:
- Aperture. The aperture is the “hole” in the center of your lens which allows varying amounts of light to be exposed on your sensor. If you increase the aperture, you will increase the size of the hole therefore allowing more light to enter and increase the brightness of your image. If you reduce your aperture, it will have the opposite effect and make your image darker.
- ISO. This is the number that is associated with how sensitive your sensor is to light. The higher the ISO the more light the sensor will be able to pick up meaning your image will be brighter. Likewise, the lower the ISO, the less light will be picked up and the image will be darker. If you set your ISO too high however, the image quality will be compromised in exchange for the high sensitivity to light making your image look very grainy.
- Shutter Speed. Shutter speed is the duration the shutter stays open to allow light into the camera. If the shutter is open longer it will collect more light. Likewise, if the shutter is open for only a fraction of a second, less light will be exposed onto the sensor creating a darker image.
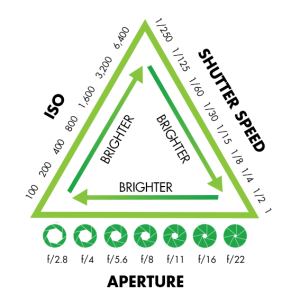
Once you play around with these 3 settings you will see how they are interconnected. Each one compliments the other and they are vital to your creative input.
One important consideration (and an example), before we move onto the next point, is the effect of shutter speed on the motion of your subject. If you are photographing a fast moving subject such as a car, ideally, you would set your shutter speed to be very fast (1/4000 of a second) to ensure there is no motion blur and the car is in perfect focus (unless of course you want the motion blur for artistic effect). By having such a fast shutter speed, you are greatly limiting how much light is entering your camera and you must therefore compensate with ISO and aperture. Increasing the ISO would be a very sensible thing to do in this case especially if there is no natural light or it happens to be overcast. Likewise, reducing the aperture will also boost the brightness of the image but will reduce the depth of field (increased foreground/background blur) around your subject.
Composition
Start using simple rules of composition such as the rule of thirds and the rule of odds to increase the appeal of your images.
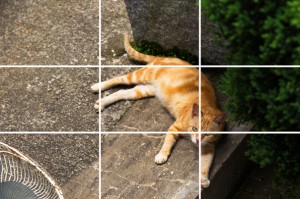
The rule of thirds suggests that if you divide a photograph into 3 equal sections (both horizontally and vertically) anything along the lines and especially at the intersecting points of the grid will draw more attention and create more balance for your subject. Therefore, if you were photographing your cat, you would want its head to be at one of the intersecting points (or its whole body if you were taking a photo from further away).
The rule of odds states that groups of odd numbered subjects/objects are more pleasing to the eye. This is due mostly to the way that our brains process information. When looking at a photograph your brain will better organize and process odd numbered groups and thus reducing the tension between the subjects. Next time you have 4 apples as a subject, eat one of them, you will increase the overall appeal of the image. Of course, if you were photographing students in a classroom, taking a photo of 4 or 6 of them might better help convey how miserable they are. How you use these rules is up to your imagination!
Don’t Zoom
Mobile devices do not have true zoom capabilities like a telephoto lens would on a DSLR camera or a mirrorless equivalent. When you are zooming into an image on a mobile device what you are actually doing is cropping into the image. Phone manufacturers have combated this issue by increasing the megapixel count on their devices and allowing you to crop into a higher resolution base image. However, there is only so much you can zoom on a mobile device before you start seeing visible artifacts in your image. I would therefore highly recommend using manual zoom instead which requires moving your legs in the direction of your subject (if possible). Clearly, if you are photographing a grizzly it may not be the smartest choice to enter its personal space.
Don’t use Flash
Flash is a very powerful tool that can certainly help you improve your images in adverse lighting conditions. Professional flash setups allow you to aim the light any direction you please, soften the brightness by adding diffusers and other accessories to your flash modules, and, better yet, take the flash off the camera and control it remotely.
Mobile flash on the other hand has none of these features. All you get is an LED that flashes directly at your subject. If “deer in the headlights” is the result you are looking for then by all means go ahead. However, if you are looking for a more pleasing result, having your subject stand by a window or finding a light source that is softer or coming from a more pleasing direction would be a much better alternative.
Ultimately, just get out there and have some fun! It is no secret that Covid-19 (and its many variants) has had a substantial adverse effect on the global happiness and mental/physical health metrics. People have been isolated, quarantined, stressed about work/finances and generally thrown off course, at least to some extent, from their point of equilibrium. Therefore, the importance of stepping away from the trials and tribulations of life for even 30 minutes a day, to engage the creative quadrants of the brain and move our legs, cannot be understated.